Welcome back to Magic Gatherings!
I hope you all had a great Battle for Zendikar prerelease last weekend! This week is more Battle for Zendikar limited. While I spent time last week scoping out BFZ‘s set mechanics and the overall texture of the format’s limited play, this week I’ll be specifically looking at booster drafting. In case you’re new to booster draft or need a refresher, check out this great article by pro player Reid Duke.
Booster draft is my favorite way to play Magic, as I love the dynamic nature of the format. Each pack presents new choices, and it’s important to be adaptable. At the same time, you can go in with a plan—and, in fact, the nature of booster draft rewards planning out a deck that gets maximum value out of cards no one else is interested in. Battle for Zendikar looks to be one of the most complex sets we’ve seen in a while, which means that both adaptability and advance planning will be rewarded. So this week, I’ll be talking about what makes the set so complex and how to plan for that complexity.
Battle Strategies
I won’t lie: the first time I saw the full spoiler for Battle for Zendikar, I thought the set was a hot mess. So many cards looked like they had abilities (ingest, devoid) tacked on for little to no reason. Other cards ([mtg_card]Malakir Familiar[/mtg_card], [mtg_card]Skitterskin[/mtg_card]) had random activated or triggered abilities. Even common cards like [mtg_card]Silent Skimmer[/mtg_card] were difficult to comprehend on first read. Processor abilities were tough to parse. It was impossible to tell what cards were Allies at a glance.
Having spent so much time last week poring over the spoiler for my limited set review, and having played in the prerelease last weekend, I’ve come around. Battle for Zendikar is a complex set, no doubt, but I now think all that complexity is a good thing. This looks to be a great limited format, one that rewards creativity, planning, and subtle distinctions between the many powerful cards in the set.
In my mind, there are four big aspects of Battle for Zendikar‘s cards that contribute to its complexity:
Cards with flexible applications
As I mentioned, a number of Battle for Zendikar‘s commons and uncommons are just a little more busy than we’re used to seeing. Because they have more abilities, they can play roles in several different decks. Take a card like [mtg_card]Sludge Crawler[/mtg_card]:
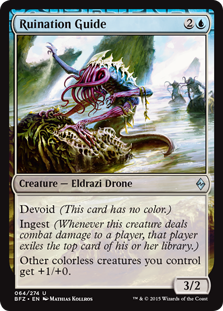
 It has devoid, so decks that care about colorless spells and creatures are interested in it—it gives a boost to [mtg_card]Vile Aggregate[/mtg_card], for example, and it gets a boost from [mtg_card]Ruination Guide[/mtg_card]. It has ingest, so decks that are looking to set up processors like [mtg_card]Murk Strider[/mtg_card], [mtg_card]Mind Raker[/mtg_card], or [mtg_card]Processor Assault[/mtg_card] could use it. And it has a flexible activated ability that lets you spend as much mana as you want, so it can be a useful piece for ramp decks that want an early blocker that isn’t an awful draw late in the game. Sludge Crawler isn’t the most powerful card, but it does a lot of different things, so it could be a useful role player for a lot of different decks.
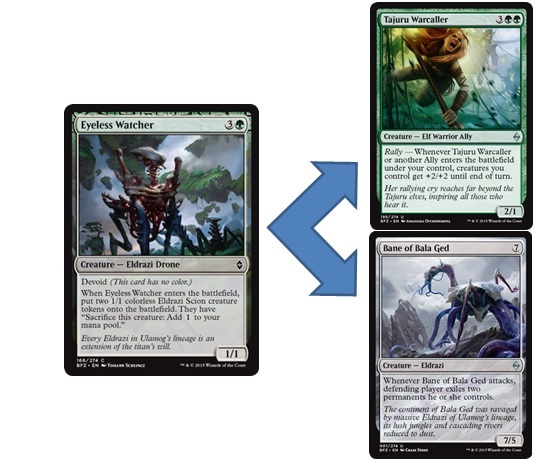 Other cards do just one thing, but the thing they do is powerful or flexible enough to contribute to several different strategies. Consider [mtg_card]Eyeless Watcher[/mtg_card], which comes with two Eldrazi Scion buddies. It puts three total creatures onto the battlefield—all 1/1s, sure, but cards like [mtg_card]Inspired Charge[/mtg_card] or [mtg_card]Tajuru Warcaller[/mtg_card] can really reward you for having lots of small creatures. Eyeless Watcher is a great inclusion in any type of “go wide” swarm deck.
On the other hand, because Eldrazi Scions can be sacrificed for a temporary mana boost, Eyeless Watcher is also a strong card in a ramp deck. Assuming you play the watcher on turn four and make your land drop on your next turn, you have access to seven mana on turn five—perfect for a big monster. BFZ has a lot of cards flexible cards like this, and lots of flexible cards means lots of tools for lots of different decks.
Cards whose strength depends on context
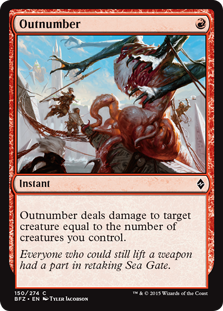
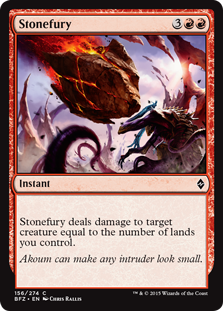
Battle for Zendikar also features a number of cards whose strength varies dramatically based on the cards that surround them. Pop quiz: which of BFZ‘s three red common removal spells is best?

False; black bear. Well, it’s debatable. It’s clear that each one of these is good in different contexts. Which one is best (and, more to the point, whether the spell is even good) depends a lot on the other cards in your deck.
[mtg_card]Touch of the Void[/mtg_card] is the most reliable. It’s a good baseline, with a reasonable cost and a good effect; it will deal three damage, just like it says, every time. (It’s also all you get: Touch will never kill big Eldrazi, for example.) It’s obviously a little better in decks that care about exiling or decks that care about colorless spells, but the variability is pretty narrow here.
In the middle, there’s [mtg_card]Stonefury[/mtg_card]. Stonefury almost always gives you a good rate, since you should have at least four or five lands in play when you cast it. You should usually be able to remove a creature of similar mana cost. It scales well into the lategame, too, killing bigger monsters as you add more lands to the table. That said, it’s a very expensive effect; it’s too pricey for early turns, and on later turns you’ll have a tough time casting it alongside another meaningful spell. It’s a bigger effect than [mtg_card]Touch of the Void[/mtg_card], at a potentially bigger cost.
At the extreme end of the scale is [mtg_card]Outnumber[/mtg_card]. In some decks, Outnumber is basically a blank: when you have no creatures in play, or only one creature, it may not kill anything at all. In other decks, Outnumber is likely to be your best card: with four or five creatures in play, Outnumber beats almost anything you want for only one mana, which is a steal—and its low cost makes it easy to add creatures to the table in the same turn you cast it. Outnumber offers a very high potential ceiling with a very low potential floor. It therefore requires you to draft with it in mind if you want to make it good.
Battle for Zendikar is peppered with cards like Outnumber, which can be excellent in some decks and mediocre or awful in others: [mtg_card]Bone Splinters[/mtg_card]. [mtg_card]Mist Intruder[/mtg_card]. [mtg_card]Inspired Charge[/mtg_card]. [mtg_card]Rot Shambler[/mtg_card]. This is a format that rewards you for having a plan in mind for your deck, knowing what cards contribute to that plan, and knowing what other cards become better because of that.
Colors and color combinations that support multiple archetypes
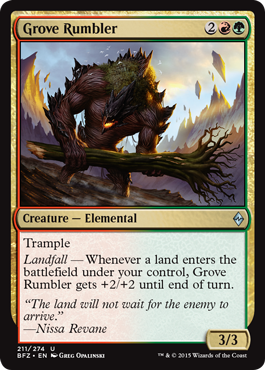 Over the last few sets, Wizards has made a dedicated effort to “seed” draft strategies for each color combination into each set. Often, each color pair gets a dual-colored uncommon as a signpost for the strategy you’re encourged to follow. Look at [mtg_card]Grove Rumbler[/mtg_card]: he says, very loudly, that if you’re drafting red-green, Landfall Is A Thing. And when you look at the set, that’s borne out—there’s [mtg_card]Snapping Gnarlid[/mtg_card], [mtg_card]Makindi Sliderunner[/mtg_card], [mtg_card]Valakut Predator[/mtg_card], and [mtg_card]Territorial Baloth[/mtg_card], all at common.
At the same time, don’t forget about our friend [mtg_card]Outnumber[/mtg_card]. As I mentioned, that card is very powerful if you draft a deck to meet its requirements. And green and red have a lot of cards that encourage Outnumber: [mtg_card]Call the Scions[/mtg_card], [mtg_card]Eyeless Watcher[/mtg_card], and [mtg_card]Brood Monitor[/mtg_card], for example. If you want those cards, you’re probably excited to pick up [mtg_card]Vile Aggregate[/mtg_card]. Then you’re probably interested in [mtg_card]Kozilek’s Sentinel[/mtg_card]. Suddenly, there’s an entirely different red-green archetype that uses almost none of the same cards as a red-green landfall deck. In fact, two players could probably draft these decks side-by-side with very little interference.
The same is true of most color pairs in this set, and even of the individual colors. Red supports Ally/Rally themes, landfall, and devoid; blue supports ingest, awaken, and scion tokens; a white-blue deck could try to kill an opponent quickly with flying creatures, or try to stall for the lategame and win with awaken spells. My point is that picking cards in Battle for Zendikar draft is not as simple as taking the “best” card in your color from each pack: you need to know what cards are best for the deck you’re drafting.
Archetypes with bonus pieces in other colors
Inasmuch as almost every color and color pair can support multiple strategies, each strategy has cards that entice you to stretch for additional colors. Consider another “signpost” uncommon, Forerunner of Slaughter:
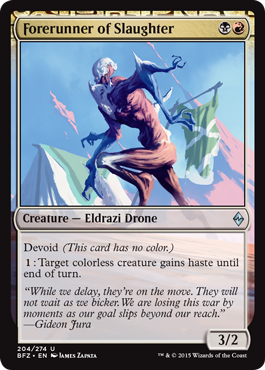 Like [mtg_card]Grove Rumbler[/mtg_card], Forerunner gives you a clear direction: take a lot of colorless creatures and a lot of other cards that make those colorless creatures better. Check the set out on Gatherer and you’ll see a lot of support: [mtg_card]Complete Disregard[/mtg_card], [mtg_card]Culling Drone[/mtg_card], [mtg_card]Vestige of Emrakul[/mtg_card], [mtg_card]Vile Aggregate[/mtg_card], and more. But you’ll also see other exciting cards:
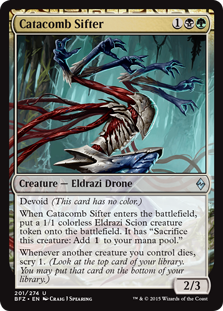
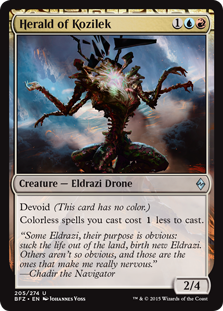
 Assuming you see these cards in a draft, do you take them and stretch your mana for them? Do you let them pass you by and focus on red and black, building a more conservative deck that can cast its spells reliably?
It’s not so much that there’s a correct answer in the abstract. Rather, the point is that in this set, Wizards isn’t giving players a set of simple paint-by-numbers draft archetypes; there are cards that really make each deck more powerful that seem intentionally placed outside the color combinations. Do these cards create entirely new decks? Or do you draft them and try to splash? It’s up to you, your ambition, and your creativity to decide—which is exactly what will make this an exciting set to draft.
So Battle for Zendikar limited is complex and subtle; it’s going to reward you for having a plan in mind when you draft and knowing what cards contibute to that plan. What do you do about it?
Plan of Attack
With complicated sets like Battle for Zendikar—particularly those where the strength of your deck depends on getting cards in just the right mix, I like to put together archetype guides. To crib from the Reid Duke article I linked above:
An archetype is a recurring strategy with numerous possible variations. The shell or pattern of an archetype remains recognizable despite individual cards changing.
Reid’s definition is essentially the way you’d talk about “the white-blue awaken deck” in a Battle for Zendikar draft or “the white-black enchantment deck” in a Magic Origins draft. It’s a useful shorthand for referring to a deck: it gives you colors and implies an overall strategy. But when you have an especially complex draft format, it’s helpful to go one step further, which is what I mean by “archetype guide”—an actual list of the cards I might draft in a typical deck of that archetype.
For example, thinking ahead to drafting that sweet-sounding red-green Scion token deck I mentioned earlier, I might assemble a grid like this:
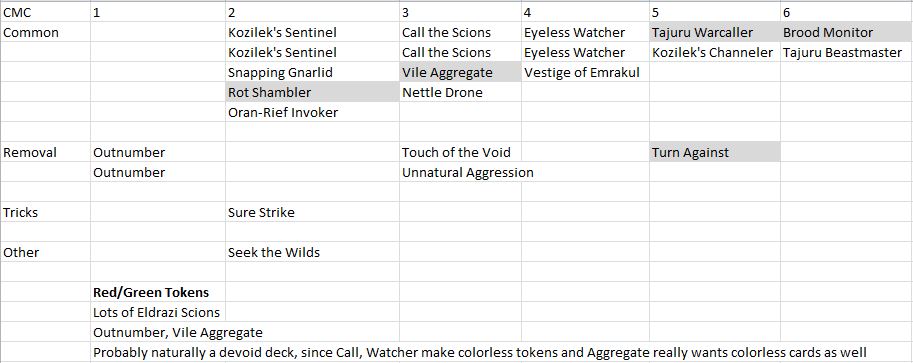 This spreadsheet is basically a theory-crafted draft deck—the cards I’d like to draft, in the colors I’d like to draft, all pulling toward the archetype I’d like to draft. Laying out a potential deck like this lets me easily see the various cards I want and the various mana costs they’ll weigh in at. It gives me a sense of what the deck’s most powerful draws might be, and how dense crucial effects (like Scion token generation) will be in a good version of the deck.
A note on the numbers here: for assembling archetypes, I assume I can draft two copies of each common and one copy of each uncommon, if I need them. This is a bit optimistic, but I like my archetypes to be representative of what a deck can look like when things go well—not least because it can show you that a particular deck may only be playable when things go perfectly. As for rares, you can’t ever guarantee opening one, but it’s useful to know the ones that are very good in your archetype, so that when you see them, you can draft accordingly. (Incidentally, cards with gray backgrounds are uncommons.)
The exercise of looking over the set spoiler and assembling these archetypes is very instructive. It quickly becomes apparent which cards you’ll play as many of as you can get, and which cards are replaceable. In the example above, [mtg_card]Snapping Gnarlid[/mtg_card] and [mtg_card]Oran-Rief Invoker[/mtg_card] seem a little out of place. In a real draft, it’s pretty clear I’d play any number of [mtg_card]Kozilek’s Sentinel[/mtg_card] over them.
 Conversely, the archetype can tell you what you’re not as excited to play: in the case of this red-green tokens deck, it’s clear that [mtg_card]Outnumber[/mtg_card] is a much more exciting card than something like [mtg_card]Stonefury[/mtg_card]. Not does this deck do what’s necessary for Outnumber to be a great card, but it’s also clear that for its best starts, it will tap out on turn five for a [mtg_card]Tajuru Warcaller[/mtg_card]; in fact, there are plenty of other things this deck could do with five and six mana. A five-mana removal spell is less good here than it would be in a landfall deck. It’s not that you wouldn’t play Stonefury in this deck, but it’s useful to know it’s not at its best.
In the same way, building an archetype guide can show you where you have lots of options and can give you pointers on what the best of those options might be.
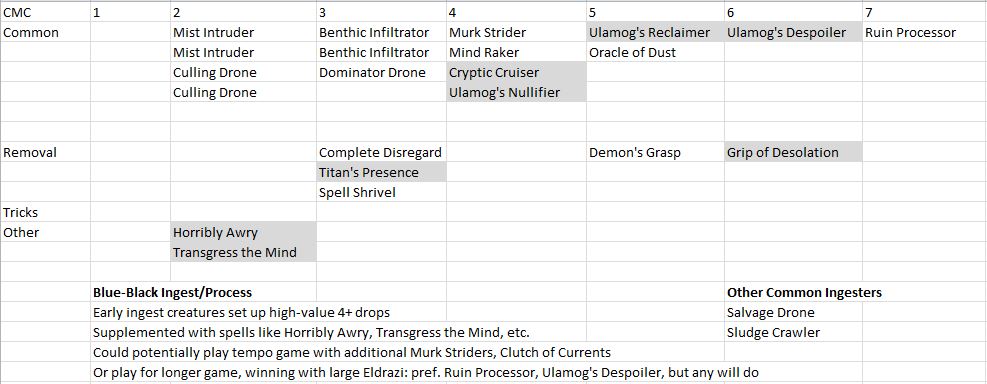 In assembling this blue-black ingest archetype, it becomes clear that blue and black both have lots of inexpensive creatures with ingest, and that some are more attractive than others. [mtg_card]Mist Intruder[/mtg_card] and [mtg_card]Benthic Infiltrator[/mtg_card] each have natural evasion, so they’re very likely to hit for damage and give you the card you need. [mtg_card]Culling Drone[/mtg_card] and [mtg_card]Dominator Drone[/mtg_card] have more power, but you need to make sure they can get though your opponent’s defenses. At the bottom of the heap are [mtg_card]Salvage Drone[/mtg_card] and [mtg_card]Sludge Crawler[/mtg_card]—both likely to be outclassed unless your opponent has quite a slow start. In a draft, seeing only the latter two may mean this archetype actually isn’t open, even if you are otherwise seeing lots of blue and black cards.
Just as crucially, an archetype guide can tell you when you have enough of a given effect. If you have a ramp deck, getting the right mix of mana production and huge creatures is crucial:
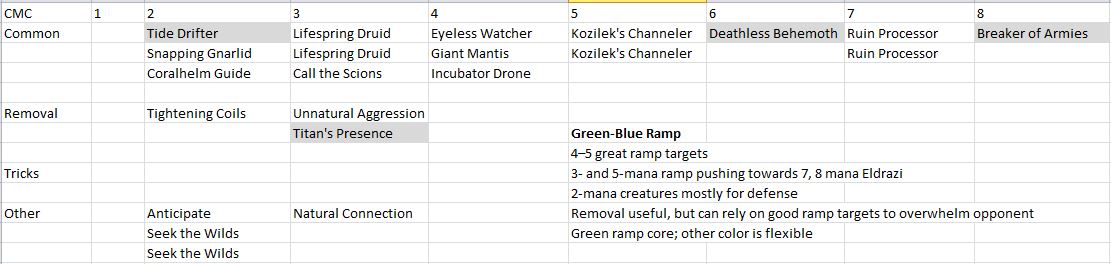 In those situations, your archetype tells you that you can pass on that [mtg_card]Eldrazi Devastator[/mtg_card] because you already have a [mtg_card]Breaker of Armies[/mtg_card], a [mtg_card]Deathless Behemoth[/mtg_card], and two [mtg_card]Ruin Processor[/mtg_card], so you’re pretty well set on ramp targets. Instead, it might be better to take that [mtg_card]Tide Drifter[/mtg_card], a card which provides a crucial effect for your deck—early blocking—even though it might not be apparent at first that Tide Drifter is a card that fits your archetype.
As you might suspect from that example, an archetype guide like this is really useful when you draft. In formats like BFZ limited, where your deck is best when it gets just the right mix of synergistic pieces, it helps to keep your archetype in mind when you make your picks: you’ve thought through an ideal (but realistic) version of the deck you’re trying to draft, so you know the cards that are crucial to take when you see them, versus the cards that are more interchangeable. And, since you’re drafting to a plan, you know you don’t need to panic if things don’t come together right away: if you finish your first pack with a smattering of different elements, you know the other pieces you need to turn them into a cohesive deck.
Of course, archetypes aren’t meant to keep you on rails. In fact, they can help you improvise on the fly. Let’s say you start out a BFZ draft with a set of conservative picks: a [mtg_card]Complete Disregard[/mtg_card], then a [mtg_card]Touch of the Void[/mtg_card], then a [mtg_card]Stonefury[/mtg_card]. For your fourth pick, you see an [mtg_card]Emrakul’s Channeler[/mtg_card]. An idea occurs to you: can you make a black-red ramp deck?
 As it happens, you can. You if you have the framework of a green ramp deck in mind, you know what the expensive spells in your deck should look like. (Note that the high-end creatures of this deck are the same as those from the green ramp deck above: all big Eldrazi with Kozilek’s Channeler to bridge the gap.) Your green ramp deck would want to push through the early game with other ramp cards (like [mtg_card]Lifespring Druid[/mtg_card]), but red-black doesn’t have that option. But what you can do is tread water by trading off creatures or using removal early, giving you time to hit your land drops and reach five mana naturally. Once you have a Kozilek’s Channeler in play, you’re golden. In other words, having archetypes in mind makes it easier to recognize specific blocks of cards that contribute to a successful deck, and adapt those to the tools you have available.
As that example suggests, it’s also important to remember that these archetype guides aren’t set in stone—think of them more as a living documents. As you get experience drafting a particular archetype, update your guide: if certain cards didn’t work, or other cards were essential, make notes, so that you have a better idea of what to prioritize and how to build your deck.
Here’s the bottom line: when you find a card or a combination of cards that seem exciting, take the time to think through the other cards in the set that help those cards along. Visualize what the deck that plays them looks like. Write it down. Then, when you draft, think back to what your archetype looked like, and fill in the pieces as best you can—or riff as you see fit.
Battle for Zendikar limited looks to be a complex and rewarding draft format. But it’s dangerous to go alone! Let your archetypes guide you, and follow your creativity and your nerve. Good luck!
I covered four draft archetypes today, but believe me when I say we’ve barely scratched the surface of what BFZ limited has to offer. On a quick count, I think there are almost two dozen archetypes you could draft—probably more, when you consider that archetypes can be adjusted for more aggressive or more controlling stances. Have fun exploring!
Next week I’ll be writing about Standard in anticipation of the upcoming Pro Tour, but let me know in the comments or in social media (tweet @cutefuzzy_) if you liked today’s article—I love drafting, so this is a topic I’d be happy to revisit!