This is part four in a series about building your own arcade cabinet. Here’s parts one, two, and three.
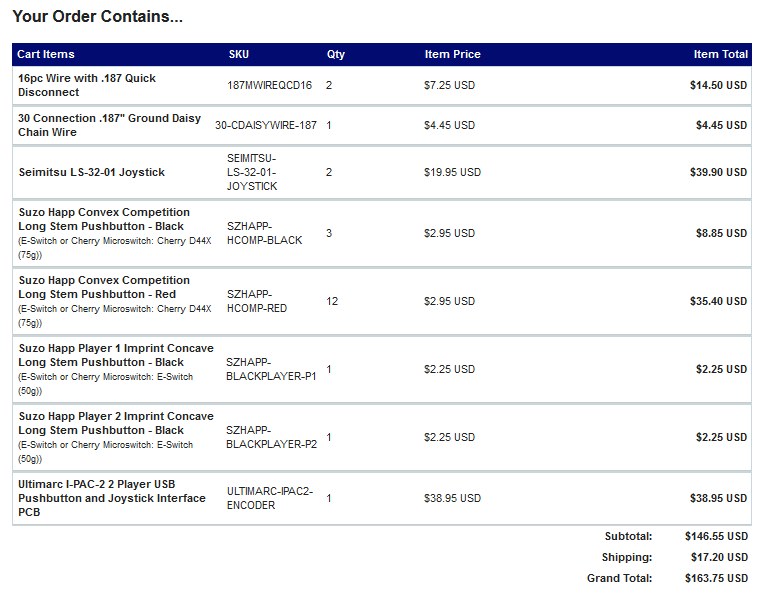
I’m afraid I’m going to cheat a bit when talking about controls. When I chose my controls, I based most of my decisions on this article from Tested.com. Really there’s not much I can do to explain the differences between your many options better than they did as this is my first cabinet and I haven’t used even a fraction of them. What I can do is explain how I made my decisions. Let’s start with my invoice from FocusAttack.com:
 Seimitsu LS-32-01:
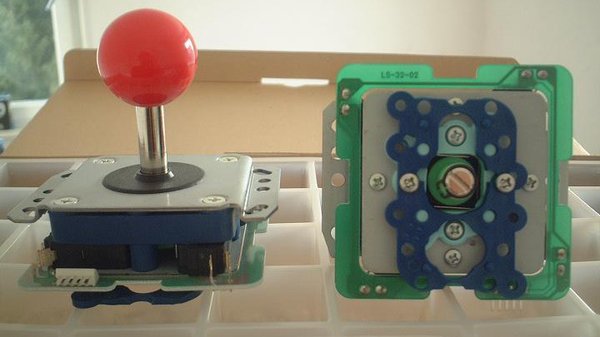
I went with the Seimitsu LS-32-01 joystick as I’m going to want to play a large range of games on my cabinet. The nice thing about this particular stick is that the restrictor plate can be adjusted to make this a 4 or 8 way joystick. The restrictor plate is essentially a piece of plastic with a hole in the middle that limits which ways the stick can move. With a 4 way restrictor plate in place, diagonal movements are rendered impossible. That means that when I’m playing a retro game like Pac-Man, I could switch the plate to 4 way mode and avoid imputing directions I didn’t intend. The hassle here is that to switch between 4 and 8, I have to actually unscrew the plate from the bottom of the stick and reattach it in the mode I want. Not something I’m going to want to do very often. If this is something you’d like to do easily, there is a stick from Ultimarc called the Mag-Stick Plus which can be switched by pulling up on the stick and rotating it 45 degrees. A nice feature, but for me not worth the extra cost for something I won’t do that often.
Suzo Happ Convex Competition Long Stem Pushbutton:
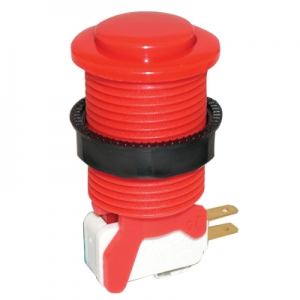
There are a few things to keep in mind when purchasing buttons; two are size related and the other is about the type of button you’re choosing. Pay very close attention to the diameter of the buttons you’re ordering. I wasn’t paying very close attention when ordering parts and almost ordered the Seimitsu PS-14-G which would have been wrong in literally every way:
- In general, arcade style push buttons come in 24mm or 30mm. My particular design is taking advantage of 30mm. I’ve got the space for it since it’s only going to be a two player machine. I almost ordered a 24mm button.
- I am using 3/4″ MDF and need a button that screws in. The PS-14-G is a snap in button that would be used if you had some sort of sheet metal surface.
- Again, I am using 3/4″ MDF, so I need a button that will extend all the way through that material. The PS-14-G is nowhere near long enough.
For me, the only logical choice was to go with Suzo Happ long stem buttons. I ordered 17 buttons total using the image of mystery_smelly_feet’s control panel as a reference. That puts me at 12 red convex buttons, 3 black convex buttons, and one black button each for player one and player two. I went with convex buttons just because I like a rounded top and find it easier to press, but that’s just a matter of preference. They have both. The only exception being the player one and player two buttons are concave. This is just because they didn’t have a convex button with the people on them, but I like the contrast anyway.
The only other thing to mention here is that I paid a little extra to get cherry micro-switches for all of my buttons. They are just a little quieter than the e-switch buttons that come standard. Again, just a matter of preference.
Wiring:
All of the switches have .187″ connectors on them so for simplicity’s sake, I will need wires that I can just slide onto these connections. So I ordered some. Simple as that. Focus Attack has a 16 pc set of wires and I have 21 buttons to connect, so I ordered two sets.
Of course, the switches will also need to be connected to a ground. Luckily, I can just daisy chain all of the switches to the same ground connection. Even luckier still, Focus Attack has a wire that is pre-daisy chained with 30 connections. More than enough!
Ultimarc IPAC2 2-Player Control Board:
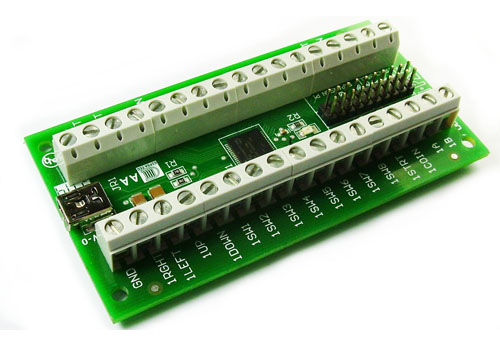
This is the money maker right here. This, folks, is what makes wiring arcade controls one of the easiest things in the world. The IPAC accepts 32 inputs and maps them to keyboard keys of your choosing, which allows for simple and customized mapping for all of your emulators. Probably the nicest thing about this board is that it doesn’t require any soldiering. Instead, each mounting point has a small flat head screw attached to a plate that clamps down on the wire, allowing for easy replacement should anything go bad.
Also, don’t be put off by the name. While I’m using the IPAC2, that doesn’t mean it’s the second iteration, but rather that it supports two players. There is also an IPAC4 if you’re making a more ambitious cabinet.
Everything’s Under Control:
So there you have it. Everything we’ll need to wire our arcade controls to our…. whatever it is that is going to be powering our games… Hmm. That’s a good question. What are we going to be running our games on?
I figure that out next!
One comment